Lets say you have some of your own samples and you would like to be able to map them into a SoundSet and play them in ManyBass. This is a very easy thing to do with the help of a free program that we make called the ManyMapper. All ManyBass customers should have received links to download this mapper with their ManyBass purchase. (It's in the ManyTone FreeZone)
Here is how the mapper will look once you install it:
There is a full manual that comes with the ManyMapper that describes the simple procedure for creating your own Soundsets from your own Samples. If you would like to read it we invite you to download it by clicking the button at the bottom of this article.
To sum it up, the basic procedure is very simple.This guide/tutorial on this page may be all you need to get you started making your own SampleSets for ManyBass.
Basic Procedure For Mapping Your Own Samples:
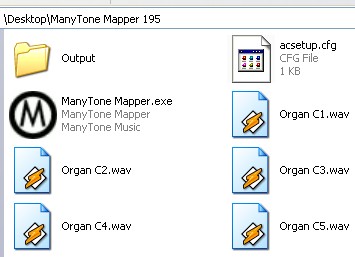
First, what you need to do, is place a copy of all the files that come with ManyMapper into the folder that contains the samples that you want to map into a Soundset. Or, alternatively, copy your samples that you want to map into the Manymapper folder. We suggest to use a copy of your samples and keep your originals in a safe place.
Once the Samples and the mapper are in the same folder together, it should look something like this:
Once you are sure that the ManyMapper folders and files show up as in the above image, including the "Output" folder, just double click the Manytone Mapper.exe file and the ManyMapper interface that you see in the top image above, will load up.
Your samples will show up in the left hand pane. If you have your samples named correctly (ie: note names like C1 D1 C2 etc), all you need to do is click the "Auto Range" button and the samples will map themselves evenly across the keyboard. You can also easily adjust or assign samples to anywhere in the keyzone and even layer multi velocity sets.
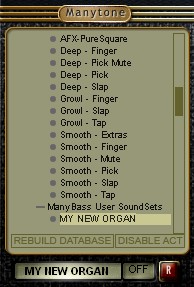
You can then name, and save the project file for future editing if needed. Once done just click the "Convert" button. This will convert your samples into a SoundSet that is playable in ManyBass. The SoundSet can be found in the "Output" folder shown above. Simply move the SoundSet to the folder on your hard drive where you have installed your Original ManyBass SoundSets. Load ManyBass and click the "Rebuild Database" button. Your Soundset will then be visable in the ManyBass SoundSet Browser window (as shown in the image below) and you will be able to play it in ManyBass.
Additional Tips:
* You'll also see in the image above that we have created a folder in our ManyBass "SoundSet" folder (or "MBSoundSets" folder on Mac) called "ManyBass User Soundsets". This folder sits "beside" our ManyBass folder. We suggest that you create a folder like this and call it whatever you would like (ie: "My Soundsets" or anything you want). You can then put your own Soundsets in this folder and you will have them all in one place for easy backup and archiving. For more details on adding sounds to ManyBass, please see the tutorial on this site called "Adding Extra Sounds to ManyBass."
* We suggest to leave the ManyMapper and the files that go with it, inside each sample folder that you convert. This way, if you saved your settings, you can easily go back and load the project file to re-edit, as all the files are in the proper location. The ManyMapper does not install as a program on your computer, but rather runs as a "tool" in each folder it is in. For that reason, just copy new versions of the original ManyMapper files you downloaded into each folder of samples you are working on.
* If you've made it this far and want a few more details, then please check out the ManyMapper manual available for download below. This tutorial you are reading now, basically covers how to do it in a simple step by step fashion, and may be all that you need to help you to create your own SampleSets fast and easily. The manual covers any extra details. We will also have some video tutorials up at some point in the future, that will show further tips and tricks for using the ManyMapper.
* Please note that this mapper for creating Soundsets is PC Windows based only. We have however had reports of Mac users running it on their emulated Windows without problems. We may also have another mapper specific for Mac at some point in the future, so keep your eyes here for it. Until then Mac users will need to use the Windows version and transfer their Soundsets to Mac, or run the ManyMapper in your Windows Emulation on your Mac.